One of the exciting new features of Istio 1.4 is
automatic mutual TLS support, which brings some long awaited convenience to Istio users configuring mTLS for their applications.
In this post, we'll be introducing the concept of
Istio's auto mTLS feature and demonstrating how it works using a demo application. Today, we'll be using our open-source
Banzai Cloud Istio Operator and our multi and hybrid-cloud enabled service mesh platform,
Backyards (now Cisco Service Mesh Manager), to install Istio 1.4, use its auto mTLS feature, and display our findings.
This post uses manual YAML editions to control mTLS settings between services. If you are interested in a more convenient and reliable way using the Backyards (now Cisco Service Mesh Manager) UI or CLI, check out our Managing mutual TLS between services with Istio blog post as well.
Automatic mTLS introduction
In previous Istio releases, it was necessary to create
Destination Rules to use mTLS. The new
automatic mTLS feature allows you to adopt mutual TLS without creating any
Destination Rule.
With the default mesh-wide
PERMISSIVE mTLS setting, Istio
automatically configures client sidecar proxies to send mutual TLS traffic to workloads with Envoy sidecars, and to send plain text traffic to workloads without them. This process is fully automated, and there is no need to worry about incorrectly configuring your
Destination Rules, which, previously, might have lead to some difficult debug issues.
This feature makes using mTLS much more convenient, but, of course, you can still set restrictions: configure a service so that it only accepts mutual TLS traffic or only accepts plain text traffic. These settings will be described later, during the demo.
Automatic mTLS is an alpha feature in Istio 1.4 and is disabled by default. It is expected, though, that it will be enabled by default in future releases.
Try it out!
Create a cluster
For this demo we'll need a Kubernetes cluster.
I created a Kubernetes cluster on AWS, using Banzai Cloud's lightweight, CNCF-certified Kubernetes distribution, PKE via the Pipeline platform. If you'd like to do likewise, go ahead and create your clusters on any of the several cloud providers we support or on-premise using Pipeline for free.
Install Istio 1.4
The easiest way of installing Istio 1.4,
Backyards (now Cisco Service Mesh Manager), and a demo application on a brand new cluster is to use the Backyards CLI.
Register for an evaluation version and run the following command to install the CLI tool (KUBECONFIG must be set for your cluster):
Register for the free tier version of Cisco Service Mesh Manager (formerly called Banzai Cloud Backyards) and follow the Getting Started Guide for up-to-date instructions on the installation.
This command first installs Istio with our open-source
Istio operator, then installs Backyards itself as well as a demo application for demonstration purposes. After the installation of each component has finished, the Backyards UI will automatically open and send some traffic to the demo application. By issuing this
one simple command you can watch as Backyards
starts a brand new production ready Istio cluster in just a few minutes! Give it a try!
Tip: Backyards is a core component of the Pipeline platform - you can try the hosted developer version here: https://try.pipeline.banzai.cloud/ (Service Mesh tab).
Enable auto mTLS with the Istio operator
As mentioned above, auto mTLS in Istio 1.4 is an alpha feature - is disabled by default - so our first step is to enable it using the
Istio operator. Just set
autoMtls: true in the spec of the Istio CR, and the operator will take care of the rest.
For the sake of this demo and to show that mTLS traffic is only turned on because of the automatic mutual TLS feature, I have also disabled the global mTLS policy in the cluster by setting
mtls: false in the Istio CR.
Observe traffic
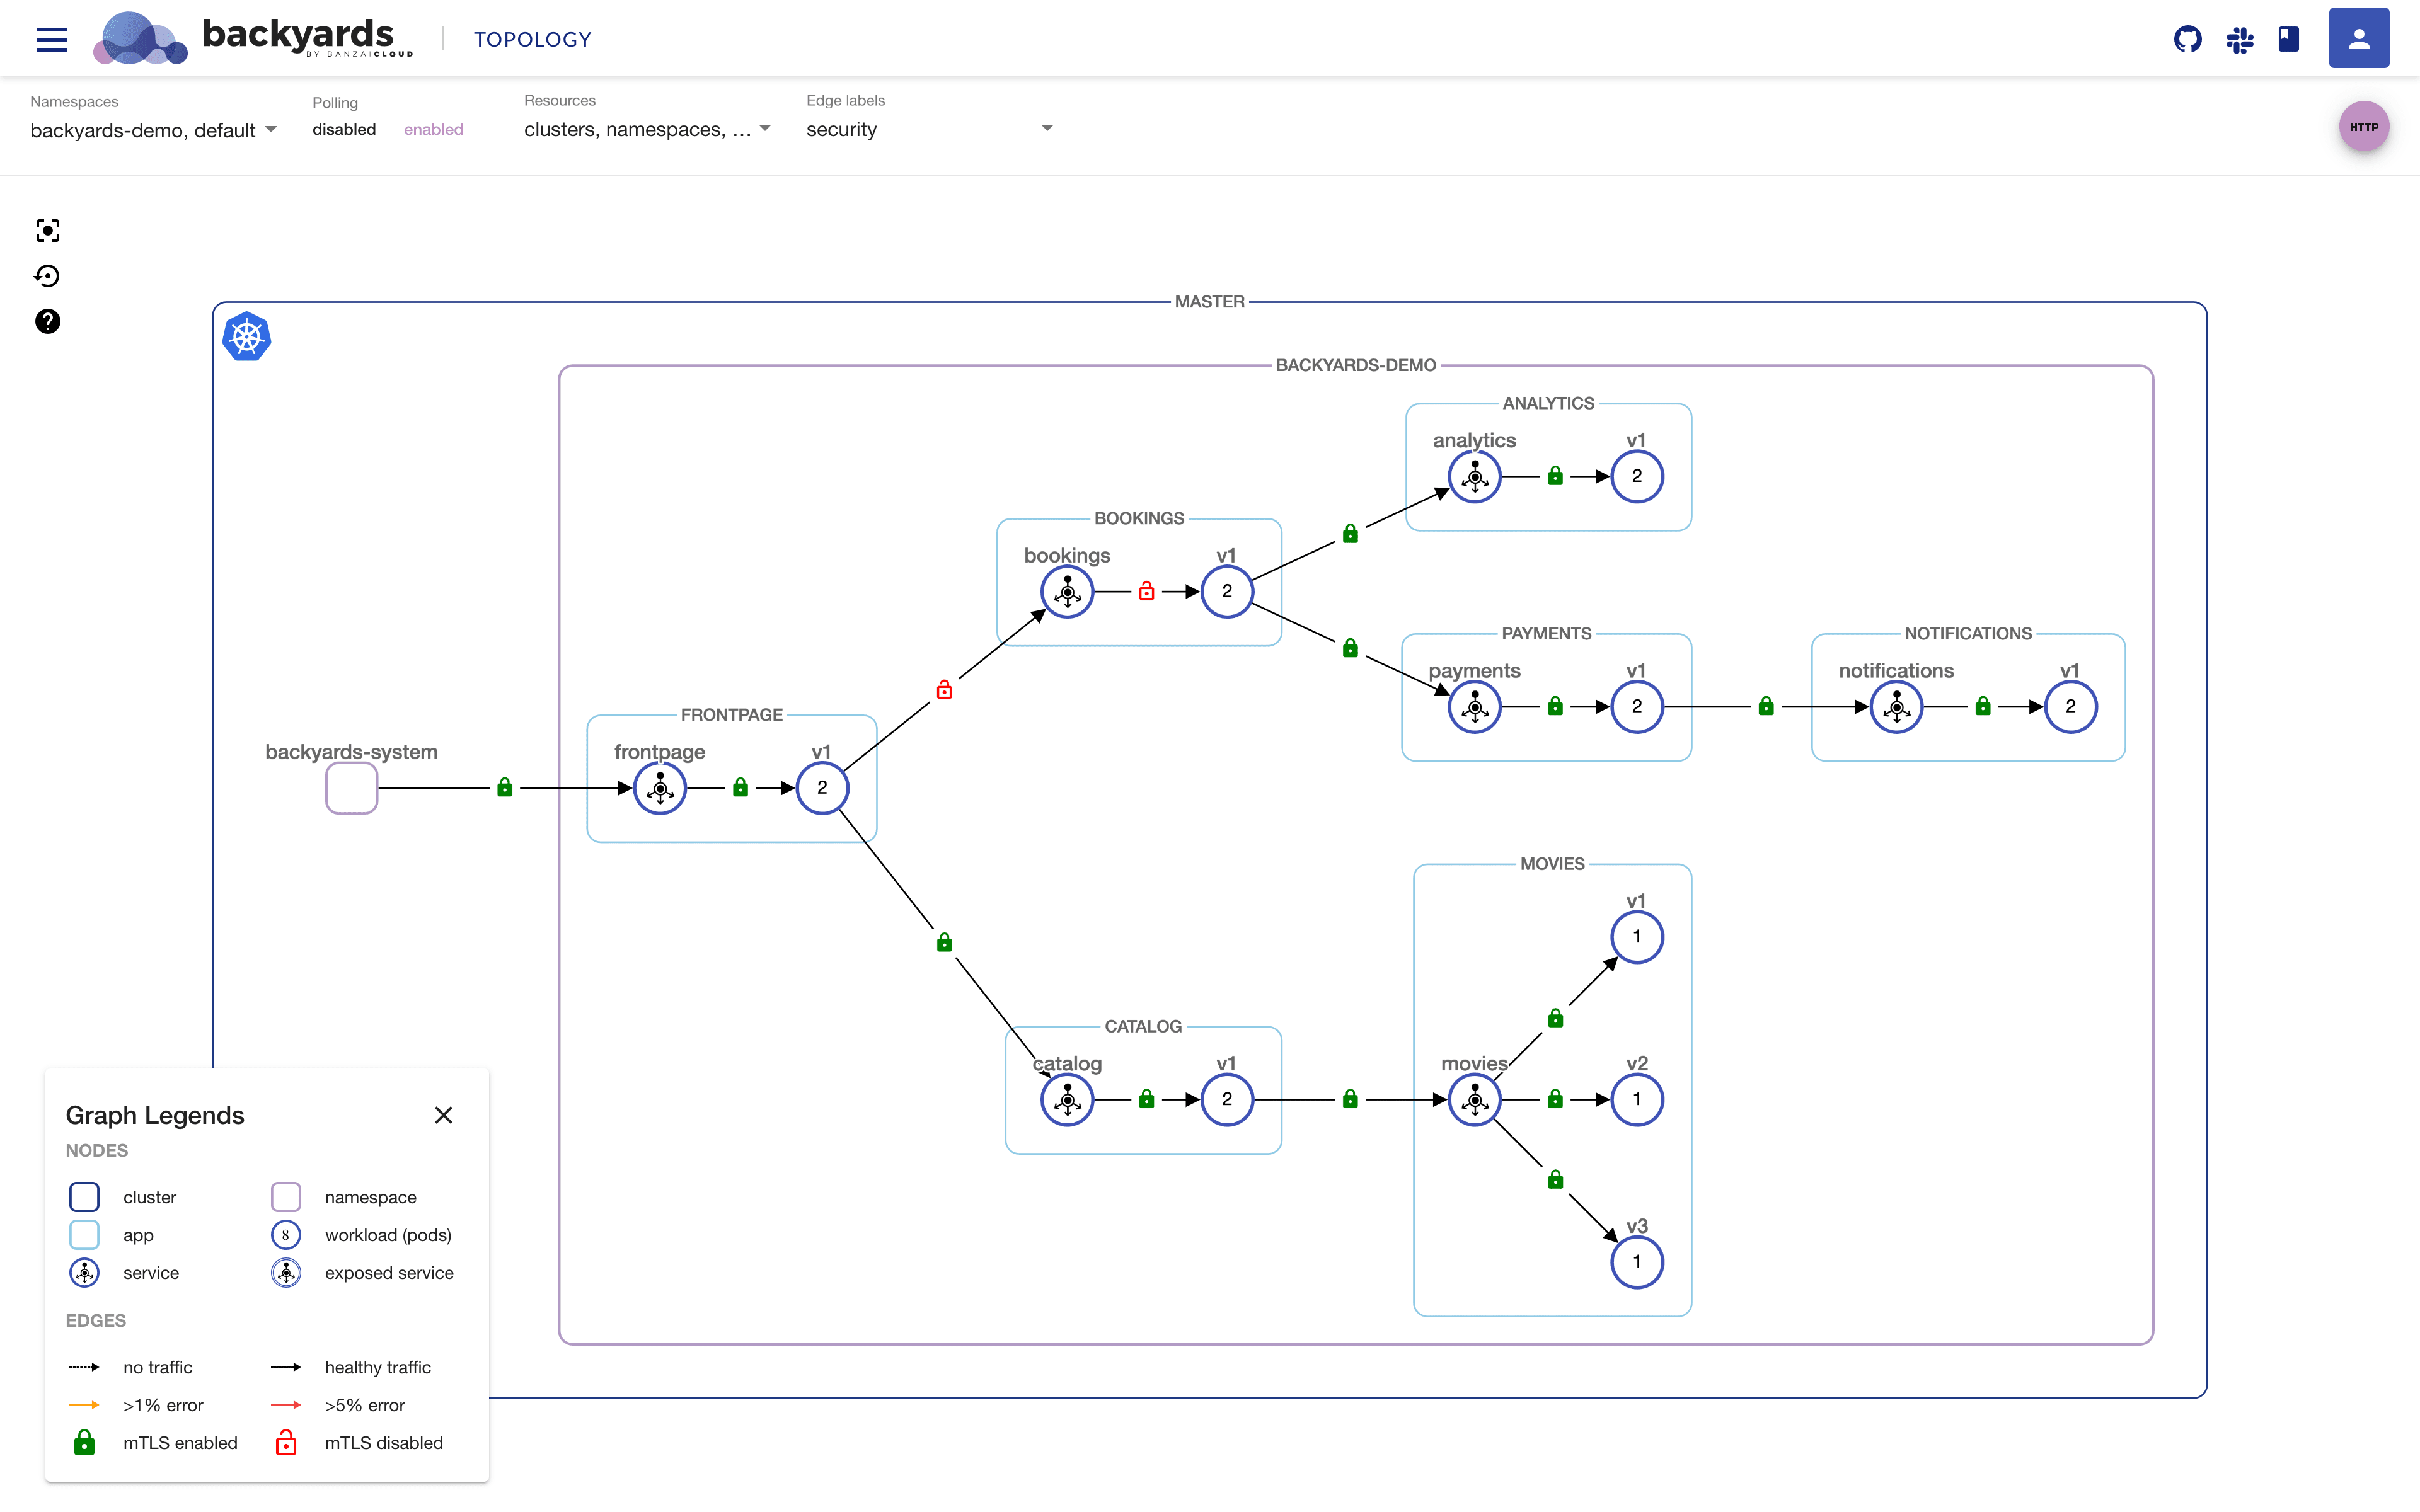
To determine whether services are communicating with mTLS or sending plain text data to each other, we'll be using the Backyards UI. In the top bar we can set edge labels to show
security, which will result in the edges showing whether mTLS is being used.
The Backyards UI should open automatically if you execute backyards install -a --run-demo, but, as an alternative, you can always open it with our backyards dashboard.
Let's explore how auto mTLS works
First, we'll explore what happens in a default setup, then we'll show what changes when we set a STRICT mTLS policy, or if we disable mTLS policy for a given service. In these examples, we'll be comparing calls that are coming from
in mesh and
out of mesh.
Default setup
By default, there is no global mTLS or any other namespace or service-based mTLS turned on in the cluster, only the auto mTLS feature we just enabled. There are no
Destination Rules or
Policies, there is only a default
MeshPolicy which enables
PERMISSIVE mTLS in the cluster. The demo application will be in the
backyards-demo namespace, where sidecar injection is turned on by default, so all workloads will be in the mesh and have a sidecar proxy.
In mesh
Backyards has a built-in load tester tool, which you can use to easily generate traffic to an application. After sending some load, you should be able to see applications with sidecars in the demo app communicating with each other using mutual TLS as indicated by the green locks on the UI.

Remember, in earlier versions of Istio this would not have been possible without configuring the necessary Destination Rules.
Out of mesh
Let's make sure it's possible to call a service in the mesh from a workload outside of the mesh, with
PERMISSIVE mTLS. First, we'll create a namespace without sidecar injection, and a curl pod in the namespace without a sidecar. Then we'll call the
bookings service from the curl pod and get the result. This call will be made without mTLS, as there is no sidecar in the pod.
$ kubectl create ns no-injection $ kubectl -n=no-injection run curl-test --image=radial/busyboxplus:curl -i --tty --rm [ root@curl-test-69897d4f95-7dd8h:/ ]$ curl bookings.backyards-demo:8080 bookings service response
Setting STRICT mTLS policy
We can put restrictions in place so that a service only accepts mTLS traffic. Let's create a
Policy resource to allow only mTLS calls to the
bookings service:
$ kubectl -n=backyards-demo apply
-f - <<EOF apiVersion: "authentication.istio.io/v1alpha1"
kind: "Policy" metadata: name: "bookings" spec: targets:

- name: bookings peers:
- mtls: {} EOF
As of now, this step needs to be done manually, but setting the TLS policy globally, or for namespaces or services, will soon be available from the Backyards UI, as well as from the CLI and GraphQL API.
You can expect many more security-related features in upcoming Backyards releases.
In mesh
If we generate another load and check on the Backyards UI, we'll see the same result as earlier: mTLS traffic flowing between services in the mesh with green locks on their edges.
Out of mesh
But now let's try calling the bookings service out of the mesh with the curl pod:
[ root@curl-test-69897d4f95-7dd8h:/ ]$ curl bookings.backyards-demo:8080
curl: (56) Recv failure: Connection reset by peer
This fails, since only mTLS traffic is allowed, and the pod without an Envoy sidecar can only send plain text data.
Disabling mTLS policy
We can also restrict a service so that it only accepts plain text calls. Let's create a Policy resource that allows only plain text calls to the bookings service:
$ kubectl -n=backyards-demo apply
-f - <<EOF apiVersion: "authentication.istio.io/v1alpha1"
kind: "Policy" metadata: name: "bookings" spec: targets:

- name: bookings EOF
In mesh
What happens inside the mesh, when only plain text is allowed?

As we can see, the traffic is still flowing but the sidecar of the frontpage service is automatically configured to send plain text data when calling the bookings service. We can see this on the UI from the red locks on the edges.
Out of mesh
Let's call the bookings service out of the mesh, again:
[ root@curl-test-69897d4f95-7dd8h:/ ]$ curl bookings.backyards-demo:8080
bookings service response
This time it succeeds, and, as we expected, it sends plain text data.
Summary
- Let's sum up what we've seen in a table:
|
from in mesh |
from out of mesh |
| PERMISSIVE |
lock |
lock_open |
| STRICT |
lock |
clear |
| DISABLED |
lock_open |
lock_open |
PERMISSIVE mTLS policy: mTLS was used from a workload with a sidecar proxy, plain text data was sent from out of the mesh
- STRICT mTLS policy: inside the mesh mTLS was used, but the service could not be called from outside of the mesh
- Disabled mTLS policy: plain text data was sent from both in and out of the mesh
Cleanup
To remove the demo application, Backyards, and Istio from your cluster, you only need to apply one command, which takes care of removing these components in the correct order:
$ backyards uninstall -a
Takeaway
The automatic mutual TLS feature brings some much anticipated convenience to Istio users when configuring mTLS for their workloads. The feature is expected to mature, until, eventually, it will be enabled by default in future Istio releases.
Auto mTLS is already supported by the Banzai Cloud Istio Operator and can be conveniently observed on the Backyards (now Cisco Service Mesh Manager) UI. Expect many more security features arriving in Backyards soon!
This post uses manual YAML editions to control mTLS settings between services. If you are interested in a more convenient and reliable way using the Backyards (now Cisco Service Mesh Manager) UI or CLI, check out our Managing mutual TLS between services with Istio blog post as well.
About Backyards
Banzai Cloud's
Backyards (now Cisco Service Mesh Manager) is a multi and hybrid-cloud enabled service mesh platform for constructing modern applications. Built on Kubernetes and our
Istio operator, it gives you flexibility, portability, and consistency across on-premise datacenters and cloud environments. Use our simple, yet extremely powerful UI and CLI, and experience automated canary releases, traffic shifting, routing, secure service communication, in-depth observability and more, for yourself.


 As we can see, the traffic is still flowing but the sidecar of the frontpage service is automatically configured to send plain text data when calling the bookings service. We can see this on the UI from the red locks on the edges.
Out of mesh
Let's call the bookings service out of the mesh, again:


